Interface Overview
Radium
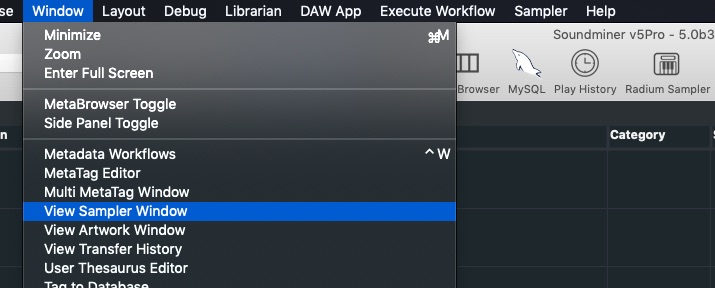
New in V5Pro is the addition of the Radium Sampler and it can be called up in the Windows menu or by inserting that option in the the toolbar.
Radium is unlike any other sampler in that it was designed for and with sound designers in mind.
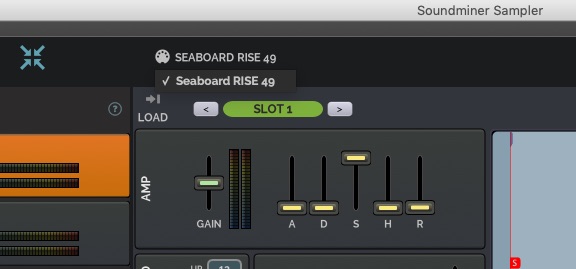
First, you will should connect your MIDI keyboard to your system by following the directions that came with your MIDI device. It should appear in your Audio/Midi utility (applications/Utilities). From there, connecting it to Radium is as simple and clicking on the MIDI button at the top of the interface:
There are 5 slots into which you can deposit sounds for further Radium processing. The simplest way to get audio into the Radium interface is using the dedicated new Sampler menu which allows you to determine which slot you wish to address. You can even create a region, or pick a leg in the V5Pro waveform editor and load just that portion directly into any slot. Each slot has a Load button that will take the current selection in Soundminer and load it in, making it instantly accessible and playable.
For those with MIDI keyboards, you can set a toggle switch to load the sound into the current viewed slot.(Go to File Menu and Set LOAD Midi CC#)

ProTip
The pitch shifter is of slightly better quality when transferring into the sampler. So while you can load a sound into the sampler and pitch it down 3 octaves, for the utmost quality pitch it down a few octaves before transferring.
Windows
Unlike mac, midi cannot be shared on windows. It is not multi-client. You cannot have reaper or protools running(and using those midi ports) and Radium. It won’t work. RtMIDI is one workaround on windows. LoopMIDI is another option.
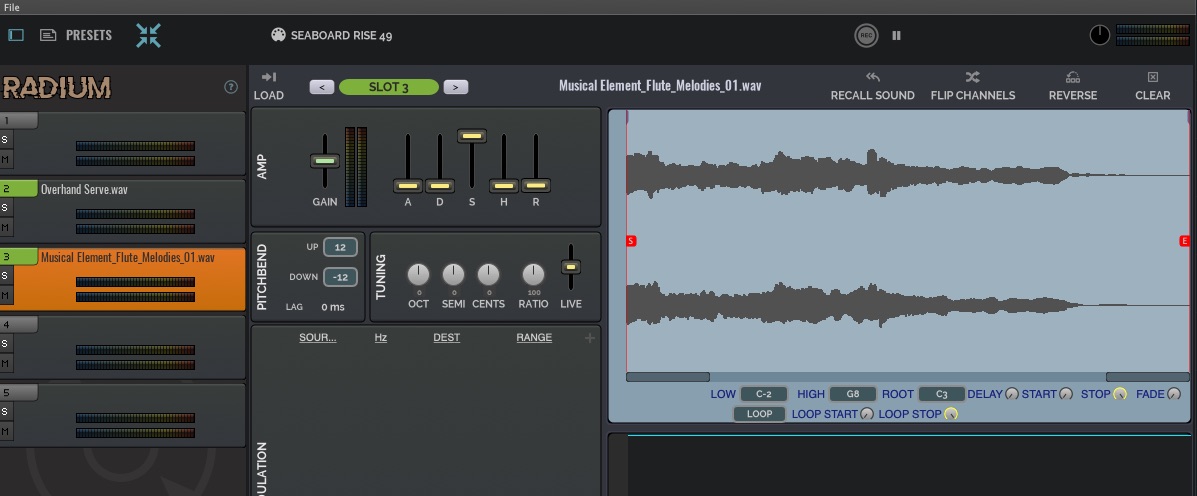
Once you load an item into a slot, then you have instant access to many further options for manipulation, but first let’s look at that each area does. When the slot is selected it turns orange in colour in the left pane and the right pane fills with its specific information. At the top is confirmation of the slot being examined, the name of the file and four further options:
RECALL SOUND at any point a user can return to the original database item by click this button. It selects the file from the database and loads it into the V5Pro waveform player in case you need to make further adjustments. You can select a new region to transfer, re-adjust pitch, find similar sounds to load into a different slot.
FLIP CHANNELS Allows you to swap the left and right legs of a stereo channel.
REVERSE - instantly play a selected item backwards. Your in and out point will adjust accordingly.
CLEAR - simple clearing of the audio of selected slot. Other parameters remain the same. If you want to do a full reset, use the File Menu to Clear Slots
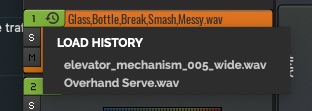
The selected slot itself has individual controls from SOLO, MUTE and even recall of previously loaded items during the current session in that slot. If a few items have been loaded into a slot during the session, the GREEN slot button will show this icon and clicking it will give you access to previously inserted clips of audio. You can navigate between different slots by using the up and down arrow keys, or clicking on one of the slots.
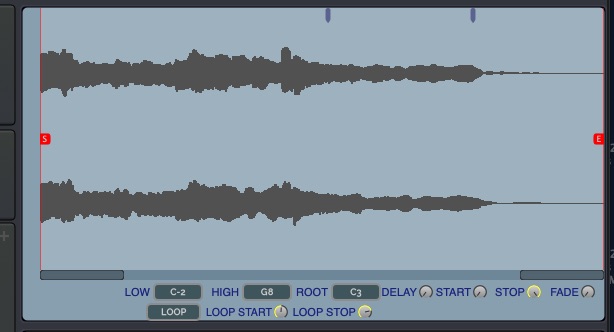
When a slot is selected the Waveform editor in the right pane will fill. This area has a number of further controls to help contour your sound. The two RED flags allow you to further edit the start and end points for playback. The scrollbar at the bottom allows you to further zoom in (zooming also support using the mouse wheel.)
Control for LOW, HIGH and ROOT determine the range of the MIDI keys. ROOT assigns the midi note key where the audio clip will play at normal speed and the LOW and HIGH options determine the range on the MIDI keyboard for that sound. By adjusting key ranges that don’t overlap amongst multiple slots, you can have the first half of your keyboard trigger thunder rolls, and the right half trigerrings thunder strikes.
DELAY, START, STOP and FADE all control the main playback of the selected file. The DELAY will add space from the time a MIDI key is depressed until the sound starts playing. It is designed to offset the playback of a sound and can be a useful tool when layering multiple sounds together. The START and STOP control the two RED flag edit markers which are easier to edit by clicking and dragging. And the FADE option allows you to create a fade applied to the end of the file. This fade will always be applied, even if the Release envelope is in progress.
Fine Tune Adjustments
Roll your mouse over most sliders and use the mousewheel without clicking to adjust a parameter. This can be easier and more precise sometimes than clicking and dragging on a control. You can also hold COMMAND key down and drag.
You can use a midi continuous controller to adjust a single parameters on a layer. To start you need to tell Radium which CC number to use, which you can do from the File menu and ‘Set Target Midi CC#’.
After you have done that, you can roll your mouse over most controls and hit ’T' on your keyboard to now target that control. You don’t have to keep your mouse over the control, but can now control it with your midi controller.
If you do this, you can’t use the controller # in the modulation area. i.e. if you assign the modulation wheel(cc#1) as the target controller, then try to ALSO add modulation wheel as a source, it won’t work.
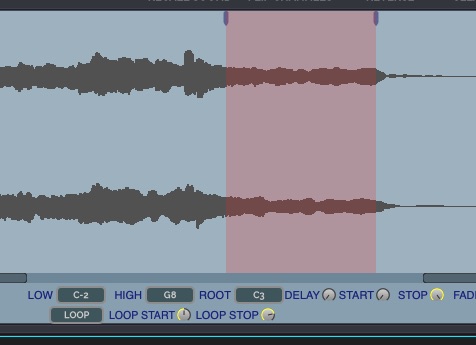
LOOPING - Beyond your initial edit, you can add loop points, so that the file will not simply stop once it has played through when a MIDI key is depressed, but begin to repeat based on secondary edit loop points. By clicking the LOOP button you will see a series of Loop options allowing you to determine how the file will play and subsequently loop or even if it will loop. By default the file will not loop. Make sure to set an end loop time that is higher than the start loop time.

When any of the looping options are selected the the LOOP START and the LOOP END control become active. And the loop edit points can be controlled by clicking and dragging the handles at the top of the displayed loop points.
AMP Control
This section governs the contouring of the amplitude envelopes, known as ADSHR or Attack, Delay, Sustain, Hold and Release. By default, all faders would be at their lowest position and the Sustain at the highest. This effectively means the sound will play immediately once a MIDI key is depressed, it will play without any other contours applied and sustain itself until it ends. When the MIDI key is release, the sound will abruptly stop playing. (There is a tiny Release enabled by default.)
ATTACK - Refers to the time it takes for your sound to go from silent to its loudest peak once a key is depressed. By raising the fader you elongate that time, similar to adding a fade at the front of a sound.
DECAY - This control the time it takes to go from peak to sustain. By playing wit the Decay and Sustain you can create initial strong peaks with quieter sustains or you can make the sustain stay at the peak level.
SUSTAIN - refers to the level your sound will maintain once it passes the initial peak.
HOLD - is an adjunct to Sustain in that is allows you to set a time to hold that sustain level after the key is released.
RELEASE - governs how the contour of the sound after the MIDI key is released. If you want a slow fade of the sound after release, increase this fader. If a HOLD parameter is set it delays the release envelope contouring until after that point.

GAIN is at it implies a control for the overall volume of the sound and is especially useful when layering and trying to get that perfect mix of sounds.
Pitch Controls
Just below the Amp section is the Pitch section.
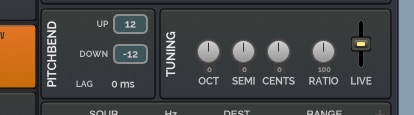
Most MIDI controllers will come with two wheels to the left of the keyboard that control Modulation and Pitch. The first control in this section governs the range of that wheel control. How much can you bend the sound up or down and it is measured in notes up or down. The LAG control allows you to insert a smooth slide to the bend when employed.
Tuning Controls give you granular control over the pitch of the item. Beyond the ROOT setting you made when the sound was loaded, you can introduce changes that can range over Octaves, Semitones, and Cents to allow for very fine tune control. The RATIO control governs control temperament. Leaving it in the default 100% position will ensure equal temperament that most western music follows. Tempering is the process of altering the size of an interval by making it narrower or wider and so it can give a non-Western sound to the intervals. It is admittedly very ‘tweaky’ but for sound effects you might not want to have recognizable pitch increments and have micro-tuned adjustments between notes.
The LIVE fader is designed to be used in conjunction with a Modulator. It overrides it all and allows you to play with pitch through its full range which can be assigned to a modulating controller. To reset, hold OPT when clicking the fader, or double click.
Modulation Effects
So if a sound file is the start of the design process, and pitch and filter envelopes carve out its path, modulation is the forge where out of the world effects are created. Radium support over 100 source MIDI modulators as well as dedicated envelopes amplitude, pitch, 2 LFOs(low frequency oscillators) various random modulators, High Pass and Low Pass Envelopes, 2 additional custom envelopes to emit modulation data, even a rudimentary Doppler envelope; all acting on the sound at the same time.
The LFO’s in Radium are pretty novel, instead of limiting you to various shapes(sine, triangle, sawtooth and square), you can draw your own shapes in. There are presets for the aforementioned shapes, but experiment with making your own!
There are basically 3 categories of envelopes.

The first envelopes we’ll discuss are tied to a sample position. You see this overtop of the waveform, and you can zoom and zoom out(using the mousewheel or the two pucks below the waveform) to fine tune adjustments. These envelopes will occur at that position in the sound no matter where you play it on the keyboard. Think of them like clip based automation lanes. So you can ramp up pitch and time at a certain point, or carve out volume adjustments. You can use Envelope 1 to do things like set the Saturation effect to a certain point when playback crosses that line. (As FX are global per slot, this would affect all voices for the slot, so really is only useful if playing one note).
The Pitch Envelope in this area is accumulative. Meaning if you have the Pitch Section set to pitch down -4 octaves this will add or subtract from that. The center line is now -4 octaves down.
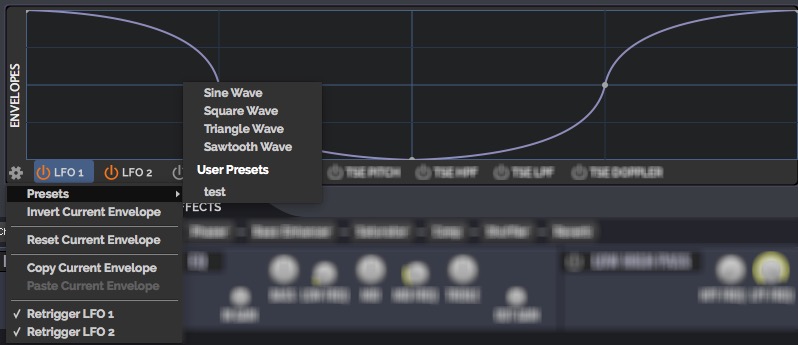
The second type of envelopes are the LFO’s. Just as the name suggests these envelope’s repeat. You can set them to retrigger their start position on a note on, or just free run. Use the GEAR icon to choose different preset shapes, and adjust the retrigger preferenmce. You use these with the Modulation area to adjust certain parameters. Try assigning to loop start position and hold a note down, when the loop happens, the loop start will be in a different spot. Or assign to the Stereo Panner to make stranger custom movements.
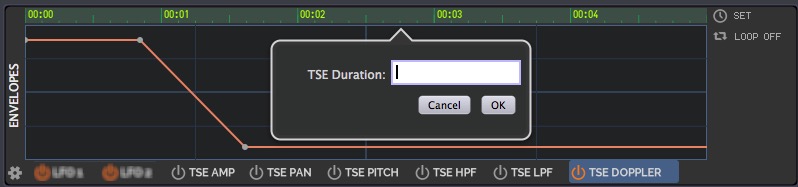
The third type of envelopes are TSE’s. (Time Scaled Envelopes). These are per voice or every note on. When you hit a note on, Radium keeps a counter of how long that voice has been playing. The time scaled envelopes do certain functions when that amount of time has passed. In comparison to the first type of envelope which scale based on how fast the sound the playing(where you play it), these envelopes are based on real time. You can do some creative sound design by having the sound always pitch up after 2 seconds, then assign a random modulator to start position. This way every note you hit will start in a different position but have the same pitch curve. You can even combine the pitch curve of the TSE with the sound specific pitch envelope! Combined you can create very powerful variations. These are also novel as they are performed per voice. If you hit multiple notes at once it’s tracking the play position of each sound. If you wanted to adjust all currently playing voices at once you could just use your pitch bend wheel, but this allows individual voice control. You can set the length of this envelope off to the right. And you can make this envelope repeat making it like an LFO, but with a fixed duration each loop. You can use this to make little doppler variations of your sounds. The doppler will do amplitude and pitch adjustments to simulate a typical doppler pass by, with the center of the envelope being the listening position. As the envelope line goes towards the top and bottom as well as lowering the volume, a slight low pass filter is added to remove some of the highs in the sound. While no substitute for a dedicated Doppler plugin, what makes this a little different is that the doppler is applied on a voice basis, so you can hit and hold notes one after another the doppler effect is attached to each note at the specific time interval. All the TSE’s can be triggered on Note Off(Release) for even more sound design weirdness! Have the pitch of a sound slide down when you release the note.
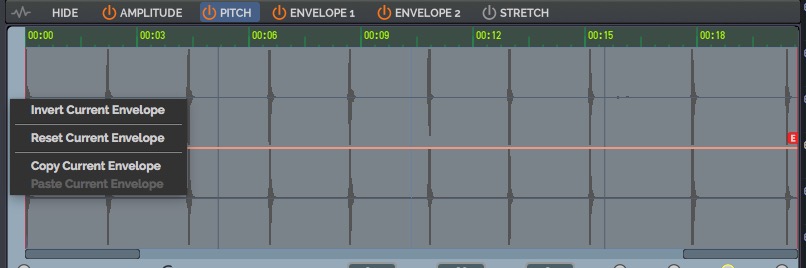
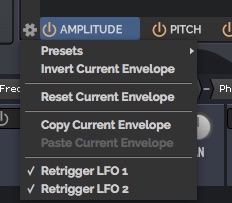
You can right click on an envelope to bring up a contextual menu to do some common things.
The gear/settings icon in the Envelope area allows you to choose whether the lfo should be retriggered on a note on or allowed to just run freely.
Random Pitch
You might be inclined to use an LFO and assign to pitch to try and create variations whenever you hit a note(and turn retrigger off). A better option is to use a specific random modulator source. Random Cents for instance...This just means the beginning pitch for a note on is going to be slightly different each time. You can adjust the range as well...
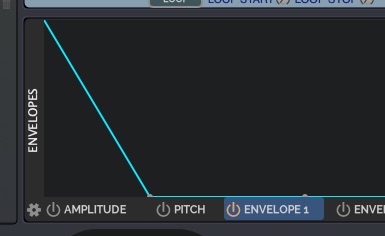
The Modulation section works in tandem with the Envelopes and Effects panes as MIDI sources can be used to then affect those envelopes and effects. The ‘+’ icon in the Modulation section adds a new modulator. From that point you begin by assigning a source and that can be any of 120 MIDI parameters. Some are preset and some are controllers that can be assigned to your MIDI controller for live input. In addition, you can use the custom envelopes and LFO envelopes as a source. For example, let’s use the LIVE pitch fader and a custom envelope to show you a simple example. Assign the Source to Envelope 1 and the Destination to Pitch Mod. Now in the envelopes pane, click and enable it so the envelope button goes orange signifying it is active. And create a steep pitch envelope from the top to the bottom.
There are some fun, unique modulators as well, random attack will add up to 1 second to the attack of every note. This way you can clip a transient which can drastically change how we perceive the same sound. There are ones for Random Pan(useful when playing clusters of notes to spread out a mono sound), different pitch amounts, and start point. You can use the random start point with a long song and a slight attack to randomly pick different parts of the sound. There are three random modulators that you can assign to parameters. These behave like sample and hold with a smoothing paramter to glide between the values. Finally there is a Note Release trigger that you can use to trigger on some FX when all notes enter their release phase. This allows you to do particular things to a sound(ring modulate a sound) when you release the note.
Assuming your modulator is active(green light to the left of it in the Modulation pane), hitting a MIDI key within the range will create a sharp pitch fall. Take the envelope and create a steep incline up and replay you file and hold the key…it should then pitch up after the pitch down. Let’s add an LFO. Add another modulator, and select LFO 1. LFOs create a pulsing oscillation effect. Do the same thing you did before and in the envelopes pane click to both enable the LFO1 option and play around with the envelope itself to determine how the pulsing will work. Now assign it to the Phaser effect’s FEEDBACK control. Make sure your effects are turned on as the Phaser effect is turned on (red colour notes it is on). Play the file and you will see a phaser being modulated by the envelope you created applied to your sound. This is just an introduction. It would be impossible to over all the permutation this allows so experimenting on your part will likely yield more learning.
ProTip
So if you want the volume to drop out a specific position just draw it in, much like clip automation. Same with pitch. In the example given above, a tracking envelope was assigned to the live pitch for demo purposes, but its much easier to draw it in with the Pitch Envelope. If you assign a LFO to a modulator and the LFO is set to retrigger on note on, the owner of the LFO is the last note played for that slot.
Curves ProTip
To get rid of a point on the envelope, hold Control and click on it. To curve a point, hold OPT down and drag between two points to curve the envelope.
The Effects area, apart from being a destination for a modulator includes 12 sound design oriented effects that can be added to any slot independently. In other words, each slot can have its own independent set of effects without having to have any modulation assigned.

Save and Re-Record
Now that you have created wonderfully new sound elements you will want to save them and perhaps even re-record a performance. In the top left of Radium is a FILE sub-menu that allows a user to to save the current state as a ‘patch’ or ‘preset’. If your DAW supports 32bit audio you might want to go the main preferences page and enable the REC is 32bit float. Otherwise live recordings are 24bit and you have a danger of clipping the output. (A warning CLIPPED indicator will show if this happens.) Swapping to 32bit allows you to overload freely and is highly recommended!
Recording takes a tap off your hardware device. So it records at whatever rate it is currently using. In v5Pro this would be under /Applications/Utilities/Audio Midi Setup. In Windows from the Soundminer menu, Setup Output Device, then click Advanced.

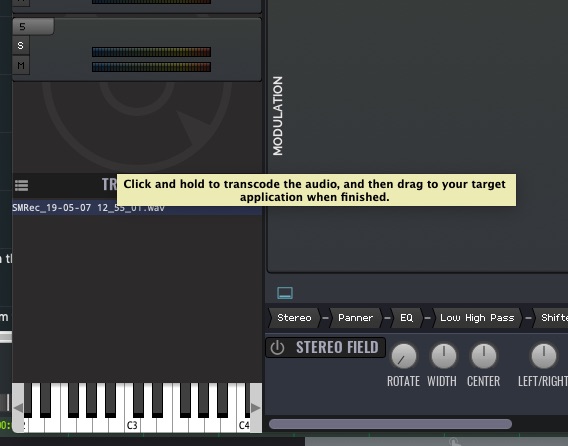
Simple offline rendering
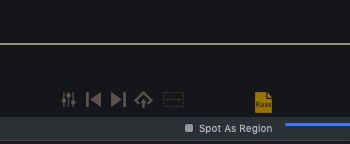
If performance isn’t a concern and you aren’t looping(let’s say you just loaded a sound into the sampler to reverse it and do some envelope things on it), you can render the file out without having to hit Record. It’ll simulate hitting MIDDLE C(C3) for as long as it takes for the sample to finish playing. So once you have everything setup you can hold the mousedown over this icon, that’ll start the process and then swap you to your target DAW. With the mouse still held down drop the sound where you like. You can even spot to a track by hitting ’s' in Radium(customized from the File Menu - Key Commands)
ProTip
Don't just click the render button, think of it like selecting a file in the workspacem you have the hold the button down and drag onto a track.
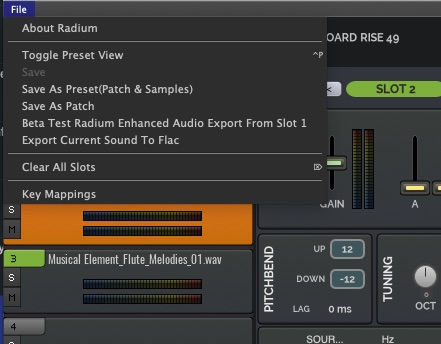
Presets are self contained packages including rendered files. Patches store the settings and a reference to the original audio. If that audio goes offline, then a patch cannot rebuild, however patches that do resolve can be loaded very fast. Presets because they contain rendered audio, have to go through a few steps to decrypt and load the audio and settings. Preset can be useful for sending to other users because they are self contained.
You can also export the current sound element as a FLAC file for those cases when you have done some destructive editing that merits keeping, or bring it into an outside editor without altering the original database asset.
And you can additionally save it in Radium enhance format which embeds all the parameters into the file so when you load that sound back into V5Pro under the waveform it is identified as “Radium Enhanced”… and clicking that icon loads the sound and all those parameters.
Global parameters to clear ALL slots and access to custom key command mapping for key functions in Radium are also available from this menu.

Effects
The Effect section contains a bunch of built in fx units that can be used to manipulate each of the slots. You can re-arrange the fx by dragging the shortcut items around. If you want to put a volume modulator after a reverb to give a choppy type sound, you can just drag to re-arrange. The shortcut items will glow reddish when they are on. You can double click the shortcut or option click on it to toggle on or off. Clicking on a shortcut will scroll to that effect so you can adjust the parameters. When you assign a modulator to a parameter, the interface will also scroll to the effect.
The sampler feeds into the DSP rack, so you can use the DSP rack to do master processing(like limiting, compression, etc). Some plugins like Zynaptiq’s Morph allow you to morph two mono sounds by having one sample on the left and the other panned to the right. You can use the stereo panner effect to pan one slot to the left channel and the other slot to the right, then quickly swap in different sounds.
So having all that knowledge in place, and having created some great new sound design, you may want to re-record it as audio to be used in a session. At the top right is a RECORD button. When clicked, it wil first ask you where you want the sound recorded. (You can change this in the TRANSFER section, where all your recorded audio is shown…where you can set it, or reveal it.) Select a valid target directory and it will lie in wait for first sound modulation triggered by your MIDI keyboard or the built-in one in Radium. When finished recording, click it again to stop recording. The sound file will be available in the Radium transfer window and loaded directly in the V5Pro waveform player ready for importing into your DAW. The file, since it was created by Radium, will be Radium enhanced and noted as such in the waveform player of V5Pro.
Both the V5pro and the Radium interface allow the user to drag the newly created file to any target by simply dragging it.
© 2020 Soundminer Inc.