Pro Tools
Using AVID Pro Tools
There are some key things to know if working with AVID Pro Tools. Firstly, understand that there are multiple ways to transfer into Pro Tools and understanding each transfer methodology is critical to workflow. Review the Introduction to Transferring to make sure you understand the different transfer methodologies.
In most cases, users with AVID Pro Tools will want to use the Spot to Timeline or Bring Into the region bin routines for transferring. These transfer features are a more refined application specific routines that allow a user to copy, convert and place a sound directly on a track at a predetermined location or in the audio list. Not all supported applications recognize this option. It requires a special recognition on the part of the receiving application to direct a Soundminer transfer to the timeline.
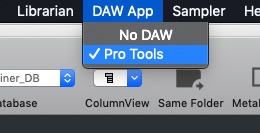
Users first need to make sure first that the DAW menu sees the intended target and you need to select it so it knows that is the destination. You can have multiple DAWs present, but transfers will be sent to the DAW selected in this menu.
Soundminer V5 should, however, do all that for you as soon as it recognizes that Pro Tools is running.
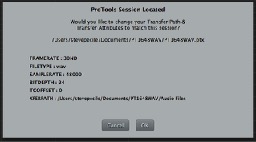
Selecting Pro Tools in the DAW menu or toggling between Soundminer and Pro Tools is usually enough to trigger the auto-sensing. When it senses Pro Tools is active, it will read the session’s parameters and present you with a confirmation or notification of change page:
If auto-sensing does not work for whatever reason, Soundminer has the ability to automatically set this up by having the user drag and drop the intended Pro Tools session onto the Soundminer Browser or onto the Soundminer icon on the Dock.
All your transfer settings will be changed to match this Pro Tools session and your new transfer path will be confirmed at the bottom of the interface:

The other parameters that will affect transfers reside in the V5 Preferences|Transfers area
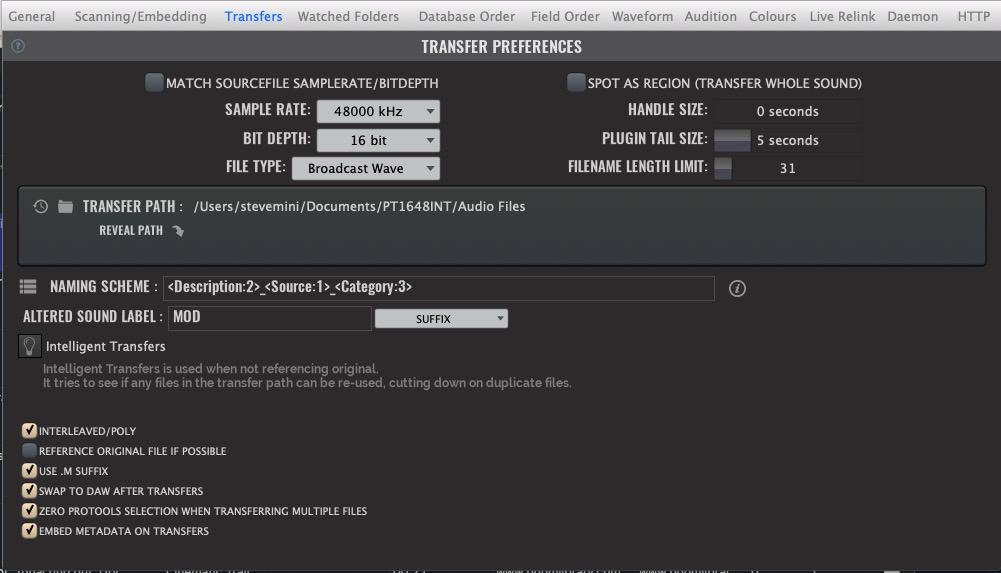
While auto-sensing the Pro Tools Session will set your Sample Rate, Bit depth, File type and Transfer path, you should familiarize yourself with the many options here. Each of them allow you to tailor your transfers: key among them is whether you are targeting stereo interleaved tracks or mono tracks in Pro Tools and whether you are copying and converting (making new files) or referencing(using existing files and their location). Each of the options is explained at the bottom on this section. For this purpose we are going to assume you wish to copy and convert as your transfer method.
With this now set, a user can safely transfer into Pro Tools using the Spot to timeline or batch transfer to the region list with the cmd-B option. Let’s look at the Spot to timeline function first: While in Pro Tools, park you cursor on a track and at a location where you want a file to be spotted. In addition, note that by making a selection across time, Soundminer can truncate to fit that selection as well.
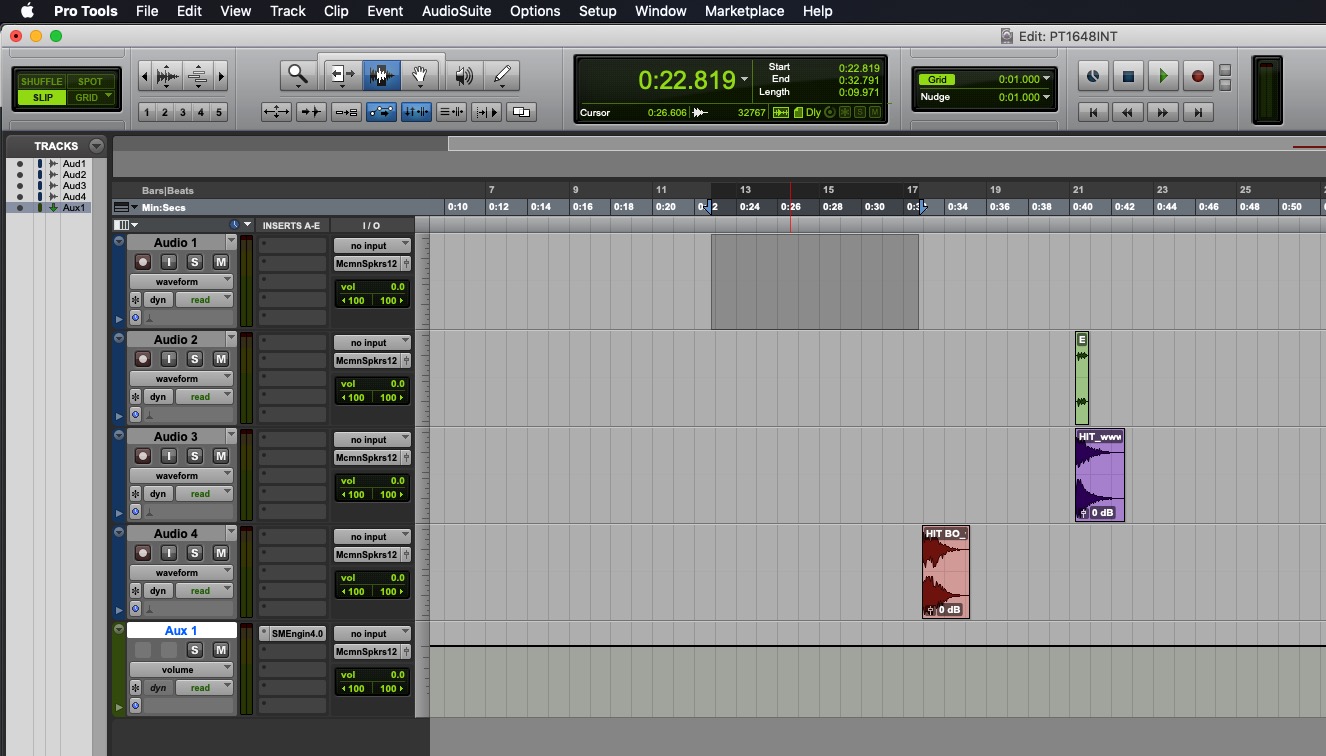
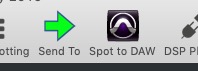
Because everything has been set up, you should be able to go into V5, find a file you want to spot and, if you wish, make an edit right from the Browser by dragging across the section you want transferred. Hitting the Spot to DAW icon in the V5 Toolbar or the quick key S will copy and convert the sound file, with an edit applied according to your preferences and place the file at the last cursor position in Pro Tools. The audio will be copied into the Pro Tools audio files folder by default. If you have selected multiple files, they will be spotted back to back starting at the cursor position.
If you have used the selection method illustrated above the sound will be truncated to match your exact in and out points (provided you transferred enough of the file). Your sound file has filled the selection in Pro Tools. You can open the edit up provided you have sent enough of the file over. If you had selected the SPOT AS REGION option, then you’d have the whole file and a region would have been made by the selection.
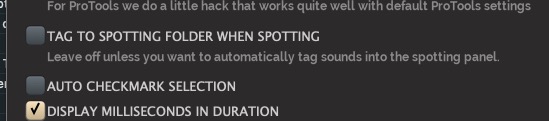
And if using the Spotting Panel, the process would have set the transferred flag to “on” so you can track which sounds have been spotted from your Project sub-pane (they turn RED when transferred). Soundminer V5 can track both batch transfers as well as Spot transfers. To turn off this feature, uncheck Preference>General>Tag to Spotting Folder.
NOTE: If you are transferring in BWAV format, V5 copies metadata from the Description field to the BWAV description container which is then visible as the “File Comment” in Pro Tools workspace.

If instead of copying and converting files into the Pro Tools audio files folder you wish to reference the original files and their positions, those originals must match the current Pro Tools session and Pro Tools naming rules or Pro Tools will enforce a copy.
Bring Into (cmd-B) will place the files in the Pro Tools Region list instead of on the cursor but the same preference caveats apply. Failures in transfers in a majority of cases are a consequence of user error. Please make sure you follow the rules of transfer when working with Pro Tools.
Troubleshooting Check the online help - https://info.soundminer.com/support
Tag to Spotting folder Soundminer has many ways to transfer, and in considering which method is best suited to your workflow, you need to also consider the use of the Spotting Panel. In the right panel, there is an option for Spotting. This area is designed to give user greater control over their transfers. For those who need to make lists, folders and create organization, this panel is something you need to understand. If, however, you plan to simply work fast with no need to organize such transfers, then you should leave this option unchecked(default) so files you transferred are not tracked by the spotting panel(Preferences>General)
You may also notice a tool in the toolbar called SEND TO. This option mimics the Apple convention allowing one application to ‘move’ a reference to a file to another application. This is the same thing as dragging an item from the finder and dropping it onto Pro Tools (either the Dock or an open session).
As noted in our Transfers section, this is a referenced transfer which means NO copying and converting is done, no file naming can be applied and the file’s pointers (where it is located) is sent in this case to Pro Tools. The receiving target then decides what to do depending on its preferences. Pro Tools has both the option to use the file ‘as is’ or to enforce a copy. This method is very simple and reliable, but users should be aware of its limitations.
These rules also apply when just dragging directly from the V5 browser to a target application than can accept such a routine. You can also select multiple files both continuously and discontinuous and click and drag them to a target. In both case, these are referenced transfers and no copying is undertaken.
Another option to the user is the use of SmartDrag: This option is wonderfully simple for those times when you just want to grab a section and drag it right into Pro Tools. Make an edit and in the edit area at the top you will see a ‘hand’ icon. Click and hold to convert(based on your main transfer preferences) and drag off the interface and if Pro Tools is selected as the DAW target, it will automatically come forward allowing you to drop it anywhere.

A few other known issues with Pro Tools
- ANNO chunk incompatibility – Pro Tools uses a proprietary method to add comment data to AIFs. We don’t currently support it. To avoid this incompatibility, use Broadcast wave files instead of AIFF.
- Ghost files when a user makes a selection in the Pro Tools timeline then tries to spot multiple files. AVID is aware of the issue but so far has not fixed it. However, as a work around, we have added a preference that will ZERO the selection before transferring multiple spotted files. Make sure that is on.
- Elastic Audio is NOT compatible with third party transfers. Elastic Audio features must be disabled in your target track to transfer from Soundminer.
© 2020 Soundminer Inc.